Java SE 6 Update 10 provides the ability to drag applets out of the browser. The two steps necessary to enable this functionality in Xubuntu 8.10 (Intrepid Ibex) are:
- Change the window-dragging keyboard shortcut in your window manager.
- Update the outdated java plugin links.
The second step is only necessary before upgrading to Java SE 6 Update 11, which has already been released as an automatic update in Windows, but has yet to appear automatically in the Ubuntu flavors of linux. (Actually, Update 12 has already been released.) The first step will be explained below using the Xfce desktop environment in Xubuntu 8.10 (Intrepid Ibex). The remaining step applies to other Ubuntu flavors as well (Kubuntu, Edubuntu, etc.).
Step 1: Changing the Window Dragging Key
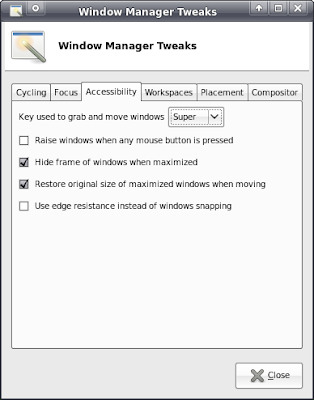
In Xfce, bring up the Settings -> Settings Manager. Click on “Window Manager Tweaks” and go to the “Accessibility” tab. Change the “Key used to grab and move windows” to anything but
Alt. In the image below,
Super is chosen:
(For instructions on how to do this in GNOME, see Cay Horstmann's
blog.)
If Java 6 Update 11 or later is installed, applying the new key shortcut above should enable applet dragging and the remaining steps should not be necessary.
Step 2: Update the Java Plugin Link
I will present two methods for updating the links to the java plugin. The first uses the graphical user interface tool
G Alternatives, and the second uses the command-line tool
update-alternatives.
GUI Method
First, install
G Alternatives using the following command:
sudo apt-get install galternatives
Launch the program with root access:
sudo galternatives &
Scroll down to the bottom of the Alternatives list on the left side and select “xulrunner-1.9-javaplugin.so” as shown here:
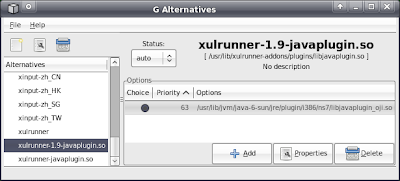
Select “auto” in the Status chooser. The Options table shows only one choice with priority 63. This is the location of the
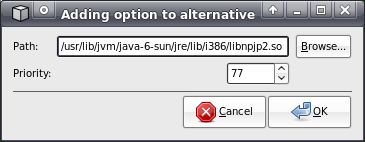
old plugin. To add the updated plugin, click “Add” and paste this path in the dialog:
/usr/lib/jvm/java-6-sun/jre/lib/i386/libnpjp2.so
Only valid file paths are allowed. So don't worry about typing the wrong value and screwing up your system. If you make a mistake in the library path, you can browse to the correct location. Enter a priority larger than the priority of the old plugin (or any other plugins in the Options table). I chose 77 as shown here:
Clicking OK should produce something like this:
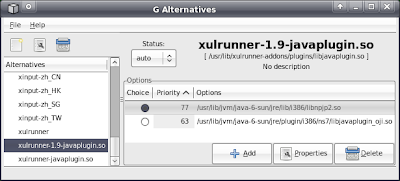
Notice that the new plugin is automatically chosen in the Choice column. This is because the auto status will automatically select the alternative with the highest priority. At this point, the system is updated. Without closing G Alternatives, launch a new Firefox browser and test if applet dragging is enabled. For my freshly installed Xubuntu system, this was all that was necessary for Firefox to start using the new plugin.
If applet dragging still does not work, close Firefox and return to G Alternatives. Scroll up in the list of alternatives to “mozilla-javaplugin.so,” as shown here:
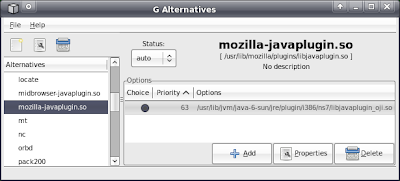
Select “auto” status if is it not already selected. Add a new option with the same path and priority as the XULRunner case above. Choose a priority larger than any other options in the table. In my case, I again chose 77 because it is larger than the highest-priority alternative option (63).
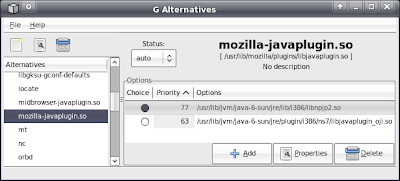
Without closing G Alternatives, test Firefox again. On my Kubuntu system, changing both the XULRunner and Mozilla Java plugins was sufficient to correct the plugin behavior in Firefox.
Once you have applet dragging working properly, you may quit. But a cleaner solution is to update
all links to the old Java plugin. Sun
recommends removing all links to the old java plugin. The list of remaining plugins that should be updated is:
firefox-javaplugin.so
iceape-javaplugin.so
iceweasel-javaplugin.so
midbrowser-javaplugin.so
xulrunner-javaplugin.so
The procedure to update these libraries is identical to the previous examples. Select each one and add a new path to the updated plugin with top priority and auto status.
Command-Line Method
The following achieves the same result as the GUI method above. The command
update-alternatives will be used to make Firefox see the correct XULRunner library. To display the current library pointed to by the XULRunner link, execute the following:
sudo update-alternatives --display xulrunner-1.9-javaplugin.so
The output should look something like this:
xulrunner-1.9-javaplugin.so - status is auto.
link currently points to /usr/lib/jvm/java-6-sun/jre/plugin/i386/ns7/libjavaplugin_oji.so
/usr/lib/jvm/java-6-sun/jre/plugin/i386/ns7/libjavaplugin_oji.so - priority 63
Current `best' version is /usr/lib/jvm/java-6-sun/jre/plugin/i386/ns7/libjavaplugin_oji.so.
This says that the library
xulrunner-1.9-javaplugin.so points to the
old plugin
libjavaplugin_oji.so with auto-selected priority 63. If status is manual, set it to auto with the following command:
sudo update-alternatives --auto xulrunner-1.9-javaplugin.so
We want to install a link to the new plugin with a priority greater than 63. The following will achieve this:
sudo update-alternatives --install /usr/lib/xulrunner-1.9.0.5/plugins/libjavaplugin.so xulrunner-1.9-javaplugin.so /usr/lib/jvm/java-6-sun/jre/lib/i386/libnpjp2.so 77
(You may have a slightly different version, like 1.9.0.4. If so, edit the command appropriately.)
Checking the display with
sudo update-alternatives --display xulrunner-1.9-javaplugin.so
produces:
xulrunner-1.9-javaplugin.so - status is auto.
link currently points to /usr/lib/jvm/java-6-sun/jre/lib/i386/libnpjp2.so
/usr/lib/jvm/java-6-sun/jre/plugin/i386/ns7/libjavaplugin_oji.so - priority 63
/usr/lib/jvm/java-6-sun/jre/lib/i386/libnpjp2.so - priority 77
Current `best' version is /usr/lib/jvm/java-6-sun/jre/lib/i386/libnpjp2.so.
So now the link points to the new plugin with priority 77, making it the best and current link. Launch a new Firefox and test if applet dragging works. If not, update the
mozilla-javaplugin.so library in a similar manner. First, execute the following:
sudo update-alternatives --display mozilla-javaplugin.so
The output should look something like this:
mozilla-javaplugin.so - status is auto.
link currently points to /usr/lib/jvm/java-6-sun/jre/plugin/i386/ns7/libjavaplugin_oji.so
/usr/lib/jvm/java-6-sun/jre/plugin/i386/ns7/libjavaplugin_oji.so - priority 63
Current `best' version is /usr/lib/jvm/java-6-sun/jre/plugin/i386/ns7/libjavaplugin_oji.so.
This is nearly identical to the XULRunner case above. Set the status to auto if necessary:
sudo update-alternatives --auto mozilla-javaplugin.so
Install the new alternative:
sudo update-alternatives --install /usr/lib/mozilla/plugins/libjavaplugin.so mozilla-javaplugin.so /usr/lib/jvm/java-6-sun/jre/lib/i386/libnpjp2.so 77
That should fix applet dragging. But for the cleanest solution, Sun
recommends updating the following libraries as follows:
sudo update-alternatives --install /usr/lib/firefox/plugins/libjavaplugin.so firefox-javaplugin.so /usr/lib/jvm/java-6-sun/jre/lib/i386/libnpjp2.so 77
sudo update-alternatives --install /usr/lib/iceape/plugins/libjavaplugin.so iceape-javaplugin.so /usr/lib/jvm/java-6-sun/jre/lib/i386/libnpjp2.so 77
sudo update-alternatives --install /usr/lib/iceweasel/plugins/libjavaplugin.so iceweasel-javaplugin.so /usr/lib/jvm/java-6-sun/jre/lib/i386/libnpjp2.so 77
sudo update-alternatives --install /usr/lib/midbrowser/plugins/libjavaplugin.so midbrowser-javaplugin.so /usr/lib/jvm/java-6-sun/jre/lib/i386/libnpjp2.so 77
sudo update-alternatives --install /usr/lib/xulrunner/plugins/libjavaplugin.so xulrunner-javaplugin.so /usr/lib/jvm/java-6-sun/jre/lib/i386/libnpjp2.so 77
Make sure they all have auto status and 77 is the highest priority.
Last Resort
If updating
/etc/alternatives/ still does not fix applet dragging in Firefox 3, you may try fiddling with links directly, but this may cause problems later when upgrading.
There are several places where Firefox 3 looks for Java plugins. One place is
/usr/lib/firefox-addons/plugins/. Place a link to the updated plugin in this directory using the following command:
sudo ln -s /usr/lib/jvm/java-6-sun/jre/lib/i386/libnpjp2.so /usr/lib/firefox-addons/plugins/sir_mix_a_lot
You may question the name of the above link. I chose this name to make the point that the name does not matter. Firefox will follow the link and load the plugin that it points to. The important thing to learn is that because names do not matter,
RENAMING A PLUGIN WILL NOT DISABLE IT. If you want to remove a plugin,
MOVE IT OR LOSE IT! You should probably rename the link to something more traditional, like “
libnpjp2.so.”
Note that the directory
/usr/lib/firefox/plugins/ is NOT the right place to fix applet dragging in Firefox 3. You can modify that directory all you want and it won't help. It may be a good idea to remove the old library link named “
libjavaplugin.so” which points to
/usr/lib/jvm/java-6-sun/jre/plugin/i386/ns7/libjavaplugin_oji.so which is the
old plugin. Sun
recommends removing all links to the old library. But removing this link is not necessary to enable applet dragging.
Another place to update the Firefox plugin is in the user's home directory. If the directory
~/.mozilla/plugins/ does not exist (it didn't exist on my machine), create it and execute the following command:
ln -s /usr/lib/jvm/java-6-sun/jre/lib/i386/libnpjp2.so ~/.mozilla/plugins/baby_got_back
Once again, the name of the link does not matter. You may choose the name “
libnpjp2.so” if you like.
So that is what worked for me. Your mileage may vary.


