Thursday, June 18, 2009

How to Fix Java Web Start After Installing Java for Mac OS X 10.5 Update 4

Java for Mac OS X 10.5 Update 4 was more than a security fix. It also moved the Java Web Start application from the /Applications/Utilities/Java/ directory to /System/Library/CoreServices/. This broke all Java Web Start applications that were launched from anywhere other than the command line. (The command line application for Java Web Start can be found at /usr/bin/javaws.)

In order to restore the desired behavior for Java and JavaFX web applications that are launched either from a web browser or from a previously downloaded Web Start file, the Finder needs to be told what to do with JNLP files. One way to do this is to Get Info on any JNLP file in the Finder, as shown here:


The image above shows that TextEdit is the application that will open the JNLP file. Instead of TextEdit.app, the combo box should show Java Web Start.app as the default application to open all JNLP files, as shown here:


Click on the combo box and select “Other...”, then navigate to the “System” folder, then the “Library” folder, then the “CoreServices” folder, and select the “Java Web Start.app” file as shown here:


Select the “Always Open With” checkbox. Click the “Add” button and close the “Get Info” window.

That's it! Now all Web Start applications will launch correctly either from a web browser or from the Finder.


Monday, May 25, 2009

Lazy Loading of JavaFX Applets

Web pages that contain large applets or many small applets can load slowly. This annoyance is one of the reasons that applets have historically been unpopular. Sun has been pushing to revive the applet by improving its reliability and encouraging its use for JavaFX deployment. Despite these improvements, JavaFX applets can produce unacceptable page load times. Java Web Start is an alternative deployment mechanism and is currently regarded as a more robust solution. Web Start avoids browser compatibility issues by running apps in a separate window from the browser, thus not affecting page load time. But there are times when it is preferable to run an application from directly within a web page.

I will show how to keep an applet within the browser window and delay applet loading until the user performs some input action, like pressing a button. The applet is said to be loaded lazily, rather than loaded eagerly at page load time. Solutions for both JavaFX and traditional Java applets will be presented.


JavaFX Applets
One way to insert a JavaFX applet into a web page is to include two JavaScripts. The first links to Sun's dtfx.js JavaScript file:
<script src="http://dl.javafx.com/1.1/dtfx.js" type="text/javascript"></script>
The second script passes the applet's launch parameters to the “javafx” function defined in the dftx.js file. Here is an example:
<script type="text/javascript">
  javafx({
    archive: "http://jfreechartscaler.appspot.com/fx/jfreechart-scalable-scrollable.jar",
    draggable: true,
    width: 466,
    height: 288,
    code: "jfreechartscalablescrollable.Main",
    name: "jfreechart-scalable-scrollable"
  });
</script>
The “javafx” function above reads in the applet launch parameters and embeds the <APPLET> tag into the HTML of the web page. The applet tag is customized for best appearance on various operating systems and web browsers.

Rather than calling the “javafx” function to insert the applet tag into the web page, we will instead call the “javafxString” function and save the generated HTML into a string. The entire operation will be placed in a JavaScript function called startApplet(). So the JavaScript above will be replaced with the following script:
<script type="text/javascript">
  <!--
  function startApplet() {
    fxstring = javafxString({
      archive: "http://jfreechartscaler.appspot.com/fx/jfreechart-scalable-scrollable.jar",
      draggable: true,
      width: 466,
      height: 288,
      code: "jfreechartscalablescrollable.Main",
      name: "jfreechart-scalable-scrollable"
    });
    document.getElementById('appletdiv').innerHTML=fxstring;
  }
  //-->
</script>
The function refers to a <div> named ‘appletdiv’ that will contain the applet. When the function is executed, the inner HTML of the <div> will be replaced with the <APPLET> tag returned from the javafxString function. The function is called when the user clicks on an image that is initially placed in the <div> when the page loads:
<div id="appletdiv" style="text-align: center;">
  <input type="image" src="http://patrickwebster.synthasite.com/resources/scroller-applet.png" alt="Click here to start applet." onmousedown="startApplet()" />
</div>
I chose to fill the div with an image that is the same size as the applet. This prevents the layout of the page from changing when the applet loads, providing a seamless transition. If you are not concerned with minimizing the intrusiveness of loading the applet, you may initiate applet loading with a button press using this more simple div:
<div id="appletdiv" style="text-align: center;">
  <input type="button" value="Click here to start applet" onclick="startApplet()" />
</div>
If all this applet stuff is new to you, I recommend that you first try lazy loading of applets using the simple button press. After everything is working correctly, you may replace the button with a custom image if desired.

A live example of using a clickable image to load a JavaFX applet can be found here. The applet on that page can be embedded into almost any web page by pasting this snippet into the HTML code:
<script src="http://dl.javafx.com/1.1/dtfx.js" type="text/javascript"></script>
<script type="text/javascript">
  <!--
  function startApplet() {
    fxstring = javafxString(
      {
      archive: "http://jfreechartscaler.appspot.com/fx/jfreechart-scalable-scrollable.jar",
      draggable: true,
      width: 466,
      height: 288,
      code: "jfreechartscalablescrollable.Main",
      name: "jfreechart-scalable-scrollable"
      }
    );
    document.getElementById('appletdiv').innerHTML=fxstring;
  }
  //-->
</script>

<div id="appletdiv" style="text-align: center;">
  <input type="image" src="http://patrickwebster.synthasite.com/resources/scroller-applet.png" alt="Click here to start applet." onmousedown="startApplet()" />
</div>


Java Applets
Lazy loading of standard Java applets is easier than with JavaFX applets because the applet code is known without having to query a server-side JavaScript function. The concept of using a div as a placeholder is the same as in the JavaFX applet case. An example of a traditional eager-loading applet is here:
<applet codebase="http://apppspot.appspot.com/java/lib" archive="jfreechart-magnifier-applet.jar,jfreechart-1.0.12.jar,jcommon-1.0.15.jar,jxlayer.jar" code="JFreeChartMagnifierApplet" alt="Dude, like you totally need Java SE 6 or later to run this applet." height="288" width="466">
 <param name="draggable" value="true">
 <param name="java_arguments" value="-Djnlp.packEnabled=true">
</applet>
To transform this eager applet into a lazy one, we will again write a JavaScript function to build the <applet> tag into string form. But we will concatenate it manually because it is already known. Building the <applet> tag above into a string is achieved with this JavaScript:
<script type="text/javascript">
  <!--
  function startApplet() {
    appletsource='<applet code="JFreeChartMagnifierApplet" codebase="http://apppspot.appspot.com/java/lib" archive="jfreechart-magnifier-applet.jar,jfreechart-1.0.12.jar,jcommon-1.0.15.jar,jxlayer.jar" alt="Dude, like you totally need Java SE 6 or later to run this applet." height="288" width="466">\n'; 
    appletsource+='<param name="draggable" value="true">\n';
    appletsource+='<param name="java_arguments" value="-Djnlp.packEnabled=true">\n'; 
    appletsource+='</applet>\n'; 
    document.getElementById('appletdiv').innerHTML=appletsource;
  }
  //-->
</script>
The string appletsource is set equal to the inner HTML of the div named ‘appletdiv’. The div is nearly identical to the JavaFX case presented earlier:
<div id="appletdiv" style="text-align: center;">
  <input type="image" src="http://patrickwebster.synthasite.com/resources/magnifier-applet.png" alt="Click here to start applet." onmousedown="startApplet()" />
</div>
To view the live example of this lazy loading java applet, click here.


Conclusion
To provide the best user experience, page load times should be minimized. Lazy loading of applets ensures that applet load time does not contribute to initial page load time. The user only incurs the penalty of waiting for a potentially slow-loading applet after choosing to do so. The user has the right to not load the applet, and in doing so is charged a minimal cost. The only cost is the initial page load time, which can be quite small compared to the time to load a large applet. By amortizing the page load and applet load times, the perceived wait time is decreased, resulting in an overall improved experience. It is polite to put the user in control. It is rude to force the user to wait a long time for a page to load without giving any warning. So please, be lazy!


Friday, April 24, 2009

JavaFX Brush for SyntaxHighlighter

I wanted to display well-formatted JavaFX Script source code using Alex Gorbatchev's SyntaxHighlighter. But the current version of SyntaxHighlighter does not include a JavaFX brush. So I wrote one. A sample of highlighted code is below. Note that some of the code is a bit silly. It is written that way to exemplify the highlighting features.
import javafx.scene.input.MouseEvent;
import javafx.scene.paint.Color;
import javafx.scene.Scene;
import javafx.scene.shape.Circle;
import javafx.scene.transform.Scale;
import javafx.stage.Stage;

/**
 * @author Patrick Webster
 */
var mouseX: Number;
var mouseY: Number;
var scale: Float = (-2.3 - 1.0) * -1.;
var egg: Circle;

Stage {
   title: "Easing Raw Egg"
   scene: Scene {
      fill: Color.BLACK
      height: 0x2EB  width: 0X30C
      content:
         egg = Circle {
            fill: Color.WHITE
            centerX: bind mouseX
            centerY: bind mouseY
            radius: 323.456e-02
            transforms: Scale {
               // Egg eases to moving mouse cursor
               pivotX: bind mouseX
               pivotY: bind mouseY
               x: bind scale * .02298E3
               y: bind scale *  32.56789
            }

            onMouseMoved: function( me: MouseEvent ) {
               updateMousePosition(me);
            }
            onMouseWheelMoved: function( we: MouseEvent ) {
               updateMousePosition(we);
               updateScale(we);
            }
         }
   }
}

function updateMousePosition(me : MouseEvent) : Void {
   mouseX = me.x;
   mouseY = me.y;
}

function updateScale(we: MouseEvent) : Float {
   var newScale = scale + (we.wheelRotation * -0.1);
   if (newScale < 1.0)
      return scale = 1.0000000e+00;
   return scale = newScale;
}

There are others who have written JavaFX brushes for SyntaxHighlighter, but they all lack the functionality that I desire. My implementation differs from others by including these additional features:
  1. Negative signs for constants are highlighted.
  2. Constants with scientific notation are highlighted.
  3. Leading and trailing decimal points are highlighted.
  4. Keywords are up-to-date for JavaFX 1.1.1.
  5. Deprecated keywords are supported.
  6. JavaFX built-in data types are highlighted differently than keywords.


Constants
In order to recognize all number formats for constants in JavaFX Script, I wrote the following horrendous regular expression:
/(-?\.?)(\b(\d*\.?\d+|\d+\.?\d*)(e[+-]?\d+)?|0x[a-f\d]+)\b\.?/gi
I am not going to explain every little detail of the above mess, but I will say that there are basically three parts. The first part matches on regular numbers with an optional leading negative sign and decimal point. The middle part looks for scientific notation. The last part checks for hexadecimal format. The major assumption is that correct JavaFX Script is the input. It is possible for the above expression to match on illegal code, but the hope is that people will not be highlighting incorrect code on their blogs. One small problem is that the above regular expression will match on the binary subtraction operator if there is no space between the operator and the subtrahend:
def b: Double = a-4;
I would prefer if the minus operator were not highlighted. But in general, it is good style to surround binary operators with a space, so this is really not a big problem.


Keywords
As the JavaFX Script language evolves, keywords come and go. The latest JavaFX Script 1.1.1 keywords are listed here. I'm sure this list will need to be updated again after the next language revision. I also include a separate list of deprecated keywords that is easily commented-out if desired.


Built-In Types
There are several built-in data types in JavaFX Script. I chose to highlight the following types in their own distinct color:
Boolean Byte Character Double Duration Float Integer Long Number Short String Void


Blogger Usage
If you followed my instructions on how to install SyntaxHighlighter into Blogger, then getting the JavaFX highlighter working will be a simple task. First you will need to download my brush file here. Expand it and place it somewhere on the internet. Then insert a link to the brush file in your Blogger HTML template. For example, I inserted this line in my template:
<script src='http://patrickwebster.googlepages.com/shBrushJavaFX.js' type='text/javascript'/>
I do not recommend that you link to my file because the file may move or change names at any time. Once the template is edited, new JavaFX code can be highlighted by wrapping it in the <pre class="brush: javafx"> and </pre> tags. The brush aliases 'jfx' or 'javafx' may be used within the <pre> tag.


Update: May 3rd, 2009
The newly released version 2.0.320 of SyntaxHighlighter includes a JavaFX brush! So you do not need to download my script. Simply upgrade to the new release and wrap your JavaFX code in the <pre> tag as explained above. You can link to the hosted version of the brush file by adding the following line to the appropriate section of your Blogger template:
<script src='http://alexgorbatchev.com/pub/sh/current/scripts/shBrushJavaFX.js' type='text/javascript'/>


Wednesday, March 4, 2009

Scalable JFreeChart JavaFX Applet

A previous post demonstrated an applet written in Swing that showed how to scale a JFreeChart using the mouse wheel. That applet lacked the ability to scroll and explore the chart when zoomed-in. This post presents a similar applet, but with the added scrolling ability. Rather than using Swing exclusively, the applet below harnesses the power of JavaFX. The mouse wheel adjusts the zoom level. When zoomed in, the chart moves continuously with the pointer, allowing the user to scroll to any part of the chart simply by moving the mouse. Holding down the Control and Shift keys while moving the scroll wheel down returns the chart to unity scale. Mac users may have to click the “Trust” or “Allow” button in order to use the applet. Less-paranoid operating systems like Linux and Windows do not require any security confirmations. Scaling may not work in Safari on a Mac.

Note: Windows users may need to right-click on the chart to enable the mouse wheel adjustments. For some reason, the popup menu that appears after a right-click causes the applet to start listening to mouse wheel events. This is most noticeable when dragging the applet out of the browser and then closing the dragged-out applet and returning to the browser window. This problem does not occur on Mac or Linux.

The Code
Unlike my previous Swing applets, the code for this applet consumes only one file. JavaFX gets a lot done in only a few lines of code. I'll run through the highlights of the code. The complete source file is available to download.

First, constants and variables are declared:
def SCALING_INCREMENT: Number = 0.1;
def MINIMUM_SCALE: Number = 1.0;

var mouseX: Number;
var mouseY: Number;
var scale: Number = 1.0;

var chartPanel = new ChartPanel(createChart());
chartPanel.setPreferredSize(new Dimension(466, 288));
var chartComponent = SwingComponent.wrap(chartPanel);
The ChartPanel is declared just as in Swing, but with type var. The key to getting the Swing ChartPanel component into JavaFX is wrapping it in the SwingComponent.wrap() method. This wrapped component will be the only content in a Group, which is the only content of the Scene as shown here:
Stage {
  title: "JFreeChart in JavaFX"
  scene: Scene {
    content: [
      Group {
        content: {
          chartComponent
        }
        transforms: Scale {
          // Bind pivot point to mouse position so
          // zooming is always centered at the pointer
          pivotX: bind mouseX
          pivotY: bind mouseY
          x: bind scale
          y: bind scale
        }
        onMouseMoved: function( me: MouseEvent ) {
          updateMousePosition(me);
        }
        onMouseWheelMoved: function( we: MouseEvent ) {
          updateMousePosition(we);
          updateScale(we);
        }
        onMouseEntered: function( me: MouseEvent ) {
          windowsHack();
        }
      }
    ]
  }
}
The power of JavaFX is revealed in the bindings within the transforms variable of the Group. These four bindings update the scale of the chart whenever the variable scale changes. Scaling is centered about a pivot point which is the current pointer position. So zooming is always centered at the mouse pointer.

There are two mouse handlers that update the bindings. The onMouseMoved and onMouseWheelMoved handlers call appropriate functions to maintain the mouse position and scaling factor variables. These functions are:
function updateMousePosition(me : MouseEvent) {
  mouseX = me.x;
  mouseY = me.y;
}

function updateScale(we: MouseEvent) : Void {
  var rotation = we.wheelRotation;
  // Control-Shift zoom-out scales back to MINIMUM_SCALE
  if (we.controlDown and we.shiftDown and rotation > 0) {
    scale = MINIMUM_SCALE;
    return;
  }
  var newScale = scale - (rotation * SCALING_INCREMENT);
  // Don't allow scaling below MINIMUM_SCALE
  if (newScale < MINIMUM_SCALE) {
    scale = MINIMUM_SCALE;
    return;
  }
  scale = newScale;
}
The mouse coordinates mouseX and mouseY are kept up-to-date in updateMousePosition(). The updateScale() function adjusts the scaling factor according to the sign and number of mouse wheel rotation units. If the Control and Shift key modifiers are enabled on the mouse event, scale is reset to its minimum value. A check ensures that less-than-unity scaling is not allowed.

Unfortunately, JavaFX applets are not immune to the annoying Windows behavior that plagued my previous applets. When the applet is first displayed on a page, it won't listen to mouse wheel events. But if a tooltip or popup menu is displayed and then hidden, mouse wheel events become active. Here is the hack to get this working:
function windowsHack() {
  // simulate right-mouse click to bring-up popup menu
  chartPanel.mousePressed(new java.awt.event.MouseEvent(chartPanel,
    0, 0,
    java.awt.event.InputEvent.BUTTON3_DOWN_MASK,
    0, 0, 1, true));
  // immediately hide the popup menu
  chartPanel.getPopupMenu().setVisible(false);
}
The onMouseEntered function calls the above method the first time the mouse hovers over the applet. A right-click is simulated and a popup menu is shown and immediately hidden. This hack only fixes the situation when the applet is first displayed in the browser. If the applet is dragged out of the browser and then returned to the browser, the user will have to manually right-click and dismiss the popup menu in order to restore correct mouse wheel behavior.

JavaFX
Unlike my previous applets, this applet does not require Java SE 6. I do not use JXLayer or any other nifty Swing libraries; therefore, it will run on J2SE 5.0. This is the latest version of Java that will run applets within a web browser on my 32-bit Intel Mac, so testing is much easier than before. Performance does suffer on Java versions prior to SE 6 update 10, but not significantly due to the simplicity of this applet.

As a first impression, I'm quite pleased with the ability to get so much out of so few lines of code. It is nice not having to write listeners and just letting the bindings take care of everything. I look forward to working with JavaFX on future projects.

Resources
To build the applet, you will need these:
  1. My code
  2. JFreeChart library (I use version 1.0.12)
  3. JFree JCommon library (I use version 1.0.15)


Friday, February 27, 2009

SyntaxHighlighter in Blogger

If you want to display well-formatted and easy-to-read source code in your Blogger blog, you may want to used Alex Gorbatchev's SyntaxHighlighter. Here is a sample of formatted Java:
public @interface Politics {}

@Override
public final void liveInAmerica(boolean insane) {
  Party<Fool>    republican = new Party<Fool>(false);
  // Party like it's 1999!
  Party<Dude> nonRepublican = new Party<Dude>(true);
  while(isBush()) {
    suffer(13);
  }
  if(insane) {
    elect(republican);
  }
  else {
    System.out.println("Free at last!");
    elect(nonRepublican);
    beHappy(7);
  }
}
In order to display my Java code, I perform the following three steps:
  1. Add CSS styles and a JavaScript to the Blogger template.
  2. Make source code more HTML friendly.
  3. Wrap code in <pre> tag when posting.


Step 1: Modify Template
In Blogger's Layout tab, select the “Edit HTML” sub-tab. Locate </head> in the text area. Right BEFORE this tag (before the <), paste the following code.
<link href='http://alexgorbatchev.com/pub/sh/current/styles/shCore.css' rel='stylesheet' type='text/css'/> <link href='http://alexgorbatchev.com/pub/sh/current/styles/shThemeDefault.css' rel='stylesheet' type='text/css'/> <script src='http://alexgorbatchev.com/pub/sh/current/scripts/shCore.js' type='text/javascript'/> <script src='http://alexgorbatchev.com/pub/sh/current/scripts/shBrushJava.js' type='text/javascript'/> <script type='text/javascript'> SyntaxHighlighter.config.clipboardSwf = &#39;http://alexgorbatchev.com/pub/sh/current/scripts/clipboard.swf&#39;; SyntaxHighlighter.config.bloggerMode = true; SyntaxHighlighter.all(); </script>
Click the SAVE TEMPLATE button. If no errors occurred, you may navigate away from the Layout tab. This step only needs to be performed once. For each subsequent blog post, you only need to do the remaining steps to get highlighted source code.


Step 2: Clean the Code
Java code that uses generics contains lots of less-than (<) and greater-than (>) symbols. These symbols confuse HTML renderers. So the generified Java must be converted to a more friendly format. That is, each less-than and greater-than symbol needs to be replaced with “&lt;” and “&gt;” (without the quotation marks,) respectively. I use an online HTML encoder to quickly format the code. There are many other tools that achieve the same result.


Step 3: Wrap Code in <pre> Tag
Precede each block of Java code with the following:
<pre class="brush: java">
Finish the code block with:
</pre>


Blank Lines in IE
In order for Blogger to display blank lines within highlighted source code on Internet Explorer, one additional setting must be adjusted. Under the Settings tab, in the Formatting sub-tab, the option “Convert line breaks” must be changed to “No.” With this setting, hard-returns typed in the WYSIWYG post editor will not be converted to HTML line break tags.

WARNING: changing this option from yes to no will reformat all posts. If you don't want to spend forever re-entering all line breaks in your existing posts, then you may want to live without blank lines in your highlighted source code. But if you only have a few posts, then it is worth the reformatting exercise. Blank lines can make long source code listings much more readable. Keep in mind that the WYSIWYG “Compose” editor will be basically useless after changing this option to “No.” All line breaks will have to be entered as <br /> tags in the “Edit Html” editor, or a third-party blog editor.


Other Languages
The brush option in the <pre> tag tells SyntaxHighlighter which language to use. If you want to post source code in other languages, you would need to change the brush type in the <pre> tag and add the appropriate language script to your Blogger template. I only use Java, so I only added the Java script. It is a good idea to add as few JavaScripts as possible to your template in order to minimize page load times. You may choose from a complete list of supported languages and add the appropriate script line to your template for each desired language. For example, to add C++ support to your blog, add the following line to your template:
<script src='http://alexgorbatchev.com/pub/sh/current/scripts/shBrushCpp.js' type='text/javascript'/>


SyntaxHighlighter Usage
In order for the “copy to clipboard” feature to work, the blog viewer must have the Flash plugin installed. Without the appropriate Flash plugin, a blank area will be displayed where the clipboard button is usually located.

If you wish to host the SyntaxHighlighter scripts on your own site and not rely on the developer's server, you can find more information here. It is preferred that you host SyntaxHighlighter on your own server in order to conserve the developer's hosting bandwidth.


Sunday, February 1, 2009

Dragging Applets Out of the Browser in Xubuntu (Intrepid Ibex)

Java SE 6 Update 10 provides the ability to drag applets out of the browser. The two steps necessary to enable this functionality in Xubuntu 8.10 (Intrepid Ibex) are:
  1. Change the window-dragging keyboard shortcut in your window manager.
  2. Update the outdated java plugin links.
The second step is only necessary before upgrading to Java SE 6 Update 11, which has already been released as an automatic update in Windows, but has yet to appear automatically in the Ubuntu flavors of linux. (Actually, Update 12 has already been released.) The first step will be explained below using the Xfce desktop environment in Xubuntu 8.10 (Intrepid Ibex). The remaining step applies to other Ubuntu flavors as well (Kubuntu, Edubuntu, etc.).


Step 1: Changing the Window Dragging Key
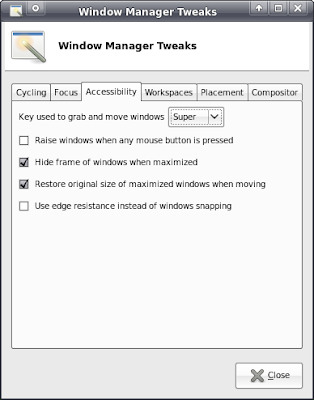
In Xfce, bring up the Settings -> Settings Manager. Click on “Window Manager Tweaks” and go to the “Accessibility” tab. Change the “Key used to grab and move windows” to anything but Alt. In the image below, Super is chosen:

(For instructions on how to do this in GNOME, see Cay Horstmann's blog.)
If Java 6 Update 11 or later is installed, applying the new key shortcut above should enable applet dragging and the remaining steps should not be necessary.


Step 2: Update the Java Plugin Link
I will present two methods for updating the links to the java plugin. The first uses the graphical user interface tool G Alternatives, and the second uses the command-line tool update-alternatives.

GUI Method
First, install G Alternatives using the following command:
sudo apt-get install galternatives
Launch the program with root access:
sudo galternatives &
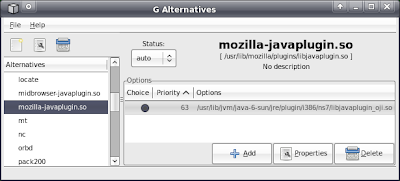
Scroll down to the bottom of the Alternatives list on the left side and select “xulrunner-1.9-javaplugin.so” as shown here:


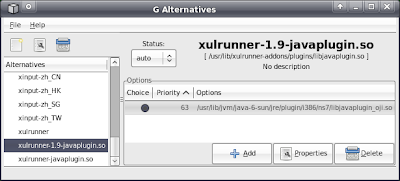
Select “auto” in the Status chooser. The Options table shows only one choice with priority 63. This is the location of the 
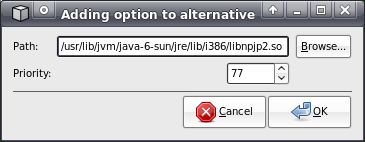
old plugin. To add the updated plugin, click “Add” and paste this path in the dialog:
/usr/lib/jvm/java-6-sun/jre/lib/i386/libnpjp2.so
Only valid file paths are allowed. So don't worry about typing the wrong value and screwing up your system. If you make a mistake in the library path, you can browse to the correct location. Enter a priority larger than the priority of the old plugin (or any other plugins in the Options table). I chose 77 as shown here:


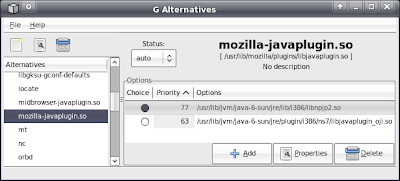
Clicking OK should produce something like this:


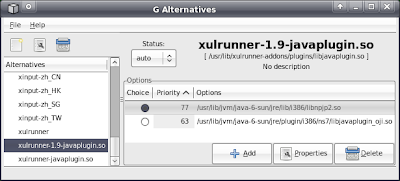
Notice that the new plugin is automatically chosen in the Choice column. This is because the auto status will automatically select the alternative with the highest priority. At this point, the system is updated. Without closing G Alternatives, launch a new Firefox browser and test if applet dragging is enabled. For my freshly installed Xubuntu system, this was all that was necessary for Firefox to start using the new plugin.

If applet dragging still does not work, close Firefox and return to G Alternatives. Scroll up in the list of alternatives to “mozilla-javaplugin.so,” as shown here:


Select “auto” status if is it not already selected. Add a new option with the same path and priority as the XULRunner case above. Choose a priority larger than any other options in the table. In my case, I again chose 77 because it is larger than the highest-priority alternative option (63).


Without closing G Alternatives, test Firefox again. On my Kubuntu system, changing both the XULRunner and Mozilla Java plugins was sufficient to correct the plugin behavior in Firefox.

Once you have applet dragging working properly, you may quit. But a cleaner solution is to update all links to the old Java plugin. Sun recommends removing all links to the old java plugin. The list of remaining plugins that should be updated is:
firefox-javaplugin.so
iceape-javaplugin.so
iceweasel-javaplugin.so
midbrowser-javaplugin.so
xulrunner-javaplugin.so
The procedure to update these libraries is identical to the previous examples. Select each one and add a new path to the updated plugin with top priority and auto status.

Command-Line Method
The following achieves the same result as the GUI method above. The command update-alternatives will be used to make Firefox see the correct XULRunner library. To display the current library pointed to by the XULRunner link, execute the following:
sudo update-alternatives --display xulrunner-1.9-javaplugin.so
The output should look something like this:
xulrunner-1.9-javaplugin.so - status is auto.
link currently points to /usr/lib/jvm/java-6-sun/jre/plugin/i386/ns7/libjavaplugin_oji.so
/usr/lib/jvm/java-6-sun/jre/plugin/i386/ns7/libjavaplugin_oji.so - priority 63
Current `best' version is /usr/lib/jvm/java-6-sun/jre/plugin/i386/ns7/libjavaplugin_oji.so.
This says that the library xulrunner-1.9-javaplugin.so points to the old plugin libjavaplugin_oji.so with auto-selected priority 63. If status is manual, set it to auto with the following command:
sudo update-alternatives --auto xulrunner-1.9-javaplugin.so
We want to install a link to the new plugin with a priority greater than 63. The following will achieve this:
sudo update-alternatives --install /usr/lib/xulrunner-1.9.0.5/plugins/libjavaplugin.so xulrunner-1.9-javaplugin.so /usr/lib/jvm/java-6-sun/jre/lib/i386/libnpjp2.so 77
(You may have a slightly different version, like 1.9.0.4. If so, edit the command appropriately.)

Checking the display with
sudo update-alternatives --display xulrunner-1.9-javaplugin.so
produces:
xulrunner-1.9-javaplugin.so - status is auto.
link currently points to /usr/lib/jvm/java-6-sun/jre/lib/i386/libnpjp2.so
/usr/lib/jvm/java-6-sun/jre/plugin/i386/ns7/libjavaplugin_oji.so - priority 63
/usr/lib/jvm/java-6-sun/jre/lib/i386/libnpjp2.so - priority 77
Current `best' version is /usr/lib/jvm/java-6-sun/jre/lib/i386/libnpjp2.so.
So now the link points to the new plugin with priority 77, making it the best and current link. Launch a new Firefox and test if applet dragging works. If not, update the mozilla-javaplugin.so library in a similar manner. First, execute the following:
sudo update-alternatives --display mozilla-javaplugin.so
The output should look something like this:
mozilla-javaplugin.so - status is auto.
link currently points to /usr/lib/jvm/java-6-sun/jre/plugin/i386/ns7/libjavaplugin_oji.so
/usr/lib/jvm/java-6-sun/jre/plugin/i386/ns7/libjavaplugin_oji.so - priority 63
Current `best' version is /usr/lib/jvm/java-6-sun/jre/plugin/i386/ns7/libjavaplugin_oji.so.
This is nearly identical to the XULRunner case above. Set the status to auto if necessary:
sudo update-alternatives --auto mozilla-javaplugin.so
Install the new alternative:
sudo update-alternatives --install /usr/lib/mozilla/plugins/libjavaplugin.so mozilla-javaplugin.so /usr/lib/jvm/java-6-sun/jre/lib/i386/libnpjp2.so 77
That should fix applet dragging. But for the cleanest solution, Sun recommends updating the following libraries as follows:
sudo update-alternatives --install /usr/lib/firefox/plugins/libjavaplugin.so firefox-javaplugin.so /usr/lib/jvm/java-6-sun/jre/lib/i386/libnpjp2.so 77
sudo update-alternatives --install /usr/lib/iceape/plugins/libjavaplugin.so iceape-javaplugin.so /usr/lib/jvm/java-6-sun/jre/lib/i386/libnpjp2.so 77
sudo update-alternatives --install /usr/lib/iceweasel/plugins/libjavaplugin.so iceweasel-javaplugin.so /usr/lib/jvm/java-6-sun/jre/lib/i386/libnpjp2.so 77
sudo update-alternatives --install /usr/lib/midbrowser/plugins/libjavaplugin.so midbrowser-javaplugin.so /usr/lib/jvm/java-6-sun/jre/lib/i386/libnpjp2.so 77
sudo update-alternatives --install /usr/lib/xulrunner/plugins/libjavaplugin.so xulrunner-javaplugin.so /usr/lib/jvm/java-6-sun/jre/lib/i386/libnpjp2.so 77
Make sure they all have auto status and 77 is the highest priority.


Last Resort
If updating /etc/alternatives/ still does not fix applet dragging in Firefox 3, you may try fiddling with links directly, but this may cause problems later when upgrading.

There are several places where Firefox 3 looks for Java plugins. One place is /usr/lib/firefox-addons/plugins/. Place a link to the updated plugin in this directory using the following command:
sudo ln -s /usr/lib/jvm/java-6-sun/jre/lib/i386/libnpjp2.so /usr/lib/firefox-addons/plugins/sir_mix_a_lot
You may question the name of the above link. I chose this name to make the point that the name does not matter. Firefox will follow the link and load the plugin that it points to. The important thing to learn is that because names do not matter, RENAMING A PLUGIN WILL NOT DISABLE IT. If you want to remove a plugin, MOVE IT OR LOSE IT! You should probably rename the link to something more traditional, like “libnpjp2.so.”

Note that the directory /usr/lib/firefox/plugins/ is NOT the right place to fix applet dragging in Firefox 3. You can modify that directory all you want and it won't help. It may be a good idea to remove the old library link named “libjavaplugin.so” which points to /usr/lib/jvm/java-6-sun/jre/plugin/i386/ns7/libjavaplugin_oji.so which is the old plugin. Sun recommends removing all links to the old library. But removing this link is not necessary to enable applet dragging.

Another place to update the Firefox plugin is in the user's home directory. If the directory ~/.mozilla/plugins/ does not exist (it didn't exist on my machine), create it and execute the following command:
ln -s /usr/lib/jvm/java-6-sun/jre/lib/i386/libnpjp2.so ~/.mozilla/plugins/baby_got_back
Once again, the name of the link does not matter. You may choose the name “libnpjp2.so” if you like.

So that is what worked for me. Your mileage may vary.


Wednesday, January 21, 2009

Scalable JFreeChart Applet

I created a new applet that allows one to scale a JFreeChart using the mouse scroll wheel. I use the term “scale” rather than “zoom” because JFreeChart already has a well-defined interface for zooming, and it is not the same behavior as my scaling. In the applet below, scrolling up will “zoom in” or magnify the view at the cursor position. Scrolling down “zooms out” centered at the cursor. The behavior is similar to the Mac OS X Universal Access Zoom behavior, which when enabled, allows the user to zoom in and out at the cursor position while holding the Control key and scrolling with the mouse wheel. To quickly get back to the original scaling, hold down the Control and Shift keys and scroll down.

Note for Windows users: if the scaling does not work or quits working, right-click to bring-up a popup menu, then click anywhere on the applet to dismiss the popup. I discussed this bug in a previous post.

The Code
The scaling is an extension of the generic ZoomUI by Piet Blok, which is built on JXLayer. Specifically, I extend two classes. My WheelZoomableUI class extends ZoomUI, and WheelZoomablePort extends ZoomPort. The WheelZoomableUI class contains only one method that overrides transformMouseWheelEvent(...). That method calls the appropriate scaling algorithms in the corresponding WheelZoomablePort class.

The scaling is performed by applying appropriate scaling and translation transformations to the AffineTransform field in the ZoomPort class. When zooming in, the operation is quite simple. First, the AffineTransform.scale(...) transformation applies the scaling. Then, the cursor position in the view is converted to the “unscaled” coordinate system. This position is then used to translate the view so that the “zoomed-in” point is centered at the original mouse cursor position. This simply means that the content under the cursor remains in the same position while scaling.

Zooming out requires one additional step. After the above scaling and translation have been applied, it is possible that part of the chart has fallen off the edge of the view. Another way of describing this is that the user zoomed-out so far that the chart has “slid over” toward the cursor. This results in a blank area in the applet window. In order to avoid this blank area, the chart needs to be “slid back” to cover the blank area. So a corrective translation is applied to ensure that no part of the view is empty.

The minimum scaling allowed is 1.0, meaning that one cannot make the chart smaller than the applet panel size. So no blank areas are possible in the applet. If you observe my magnifier applet, it is possible to zoom out to a scaling factor less than 1.0. This creates a blue area within the magnifying glass that shows the area outside the chart. This blue area corresponds to the empty area described above that necessitates the corrective translation when zooming out.

Constructing the applet is quite simple, as seen here:
public JXLayerScaleDemo() {
  super();
  XYDataset dataset = createDataset();
  JFreeChart chart = createChart(dataset);
  chartPanel = new ChartPanel(chart);
  final WheelZoomablePort zoomPort = new WheelZoomablePort();
  final WheelZoomableUI zoomUI = new WheelZoomableUI();
  zoomPort.setView(chartPanel);
  zoomPort.setOpaque(true);
  final JXLayer<ZoomPort> layer = new JXLayer<ZoomPort>(zoomPort, zoomUI);
  chartPanel.setPreferredSize(new java.awt.Dimension(480, 260));
  setContentPane(layer);
}

Instances of the WheelZoomablePort and WheelZoomableUI are created from the default constructors. The view of the port is set to the chart panel. Then the port and UI are sent to the JXLayer constructor. The JXLayer is then set as the main content.

Future Work
As mentioned above, the wheel zoomer behaves similarly to the Mac OS X Universal Access Zoom, but with one important omission. When zoomed-in, the user cannot pan and explore the hidden parts of the panel. Luckily, JXLayer already has a nice UI to handle panning and scrolling called MouseScrollableUI. I hope to add this functionality in the future.

From a coding perspective, it is not really necessary to subclass ZoomUI and ZoomPort. It may be better to simply add a MouseWheelListener to the ZoomPort and override the mouseWheelMoved method. In fact, the test classes in the ZoomUI and the new TransformUI packages do just this to achieve similar scaling behavior without subclassing.

Resources
To build the applet, you will need these:
  1. My code
  2. JXLayer library (I use version 3.0)
  3. JFreeChart library (I use version 1.0.12)
  4. JFree JCommon library (I use version 1.0.15)
The first link above is a modified subset of Piet Blok's generic ZoomUI released on January 11th, 2009.


Tuesday, January 13, 2009

JFreeChart and JXLayer Adjustable Magnifier

JXLayer is cool. I wrote about Dave Gilbert's demo applet that uses JXLayer and Piet Blok's work to show a magnifying glass over a JFreeChart. Since then Piet has updated his MagnifierUI code and I extended it into a more configurable magnifying glass. In the applet below, you should be able to use your mouse wheel to adjust the magnification factor of the magnifying glass. Also, while holding down the Control and Shift keys, the mouse wheel should adjust the size of the magnifying glass.

Note: Windows users may need to right-click on the chart to enable the mouse wheel adjustments. For some reason, the popup menu that appears after a right-click causes the applet to start listening to mouse wheel events. This is most noticeable when dragging the applet out of the browser and then closing the dragged-out applet and returning to the browser window. This problem does not occur on Linux.

The code is pretty straightforward. I created a subclass of MagnifierUI called AdjustableMagnifierUI. In it I override the processMouseWheelEvent method. If the Control and Shift keys are pressed on a mouse wheel event, the setMagnifyingFactor method in MagnifierUI is called. If no modifier keys are pressed, the setRadius method is called.

The Windows hack is in the applet class. I override setVisible as follows:
public void setVisible(boolean visible) {
  super.setVisible(visible);
  if (isShowing()) {
    // simulate right-mouse click to bring-up popup menu
    chartPanel.mousePressed(new MouseEvent(chartPanel,
        0, 0,
        java.awt.event.InputEvent.BUTTON3_DOWN_MASK,
        0, 0, 1, true));
    // immediately hide the popup menu
    chartPanel.getPopupMenu().setVisible(false);
  }
}
If the applet is showing, I simulate a right-mouse click to bring-up JFreeChart's popup menu. Then the popup is immediately hidden. This enables the mouse wheel events to be handled correctly in Windows XP SP3. This hack only works when setVisible is called. If the user has Java SE 6 Update 10 or later and he drags the applet out of the browser and then closes the dragged-out window, the applet returns to its original spot in the browser window WITHOUT calling setVisible. In this case, mouse wheel events will not cause any magnifier adjustments UNTIL the user right-clicks and shows the popup menu. Dismissing the popup will restore the desired mouse wheel behavior. Does anyone know why this is or have a better solution? This hack is not needed on Ubuntu Linux 8.04.

I ran into one other problem when posting the applet. In order to avoid an AccessControlException, I had to override the isAWTEventListenerEnabled() method to return false in AdjustableMagnifierUI:
@Override
protected boolean isAWTEventListenerEnabled() {
  return false;
}
I didn't notice any problems from overriding this method. Or perhaps this is the cause of the Windows misbehavior? I would appreciate any feedback on this.

To build the applet, you will need these:
  1. My Code: tar.gz or zip
  2. JXLayer library (I use version 3.0)
  3. JFreeChart library (I use version 1.0.12)
  4. JFree JCommon library (I use version 1.0.15)
The first code link above is a modified subset of Piet Blok's generic ZoomUI released on January 11th, 2009.